Friday, December 20, 2013
Monday, July 8, 2013
Project Glass Explorer Program Pickup
All that was asked what that you post with the hashtag #ifihadglass. I didn't waste anytime at all and quickly thought about things that I would do. The obvious choice for me was something on the DigitalChalk platform. Here is what I responded with:

After that, I really forgot about it until the Twitter account of Project Glass (@projectglass) responded to me a little over a month later letting me know that I was chosen to be a part of the program.

I was certainly excited to see that and then the wait began. I waited for 3 months before hearing from Project Glass again. I started to wonder if maybe they had eliminated me as a participant or even forgot about some. Then, on June 21st I got a direct message from them that invited me to schedule my pickup in New York City. That night I went online, ordered Glass and booked my plane tickets.
This past weekend, I flew to New York to pick them up. We were able to invite one person to go with us to the pickup and I asked my brother-in-law to go since he lives in New York near the city. We met at Starbucks across the street in Chelsea Market and then walked over the Google offices where the pickup for Project Glass was located. We were greeted as soon as we got off of the elevator by two people in reception wearing Glass and they checked us in and gave us guest badges marked with Explorer Edition.

After a very brief wait, we were met by our Glass Guide, Sunil who was awesome. He took us back to his station and then let us try on all of the different colors of Glass. Even though I had specified the color online when I purchased them, he asked if I would like to switch.

I chose to stick with Shale and by the time we got back from the fitting station, someone had brought a new box to the desk with a Shale pair of Glass. After a quick chat, I proceeded with the unboxing and Sunil let me through fitting them to my face and then through the basic setup of connecting them to my phone and to the wireless network. The phone is connected through Bluetooth pairing and connecting to the wireless network was made easy by inputing the connection information in my glass profile online and then scanning a QR code with my Glass to configure them.
Sunil then let me up on to a platform overlooking the New York City skyline, complete with the Freedom Tower in the distance. Here he taught me how to take pictures and video in different ways and how to perform a Google search with Glass.


I can't wait to see what the future holds!
Tuesday, January 1, 2013
Tuesday, December 25, 2012
Merry Christmas
Host: cloudchamp.com
Content-Type: application/json;charset=UTF-8
Content-Length: 176
{
"author": "Troy",
"content": "Merry Christmas! Remember the reason for the season. \u003ca href=\"http://bible.us/116/luk.2.1-20.nlt\"\u003eLuke 2\u003c/a\u003e"
}
Tuesday, July 3, 2012
Happy 4th of July
Independence Day is one of my favorite holidays. I can't help but smile and fill with pride when I see the red white and blue of the flag go up in store windows, street corners, and on the front porches of so many homes. It is a feeling of strength, of pride, of gratitude and humility all neatly wrapped into one. It is a feeling that warms the heart and the soul. It is hamburgers and hotdogs, fireworks and swimming pools, parades and homemade apple pie and ice cream. I am so grateful to live in this country and have the freedoms that we enjoy. I have such respect for every man and woman that has served in our armed forces and in the agencies that protect our freedoms. Everything that we enjoy is owed to the brave men and women who have fought and stood with unfailing courage against the enemies of the freedom we so cherish, many giving their own lives to protect the way we get to live. Thank you to my father and uncle for their valiant service in Vietnam and after. Thank you to my brother-in-law for his service in Iraq. A huge thank you to all of you who have served - past and present heros. As I enjoy my traditional 4th of July pancake breakfast and family barbecue with fireworks, I will do so with smiles and laughter mingling in the air, pride in my heart and a lump in my throat - enjoying my family and the celebration and remembering the sacrifices that were made for what is truly special and uniquely American. Happy 4th of July!
Wednesday, June 27, 2012
Video Based Learning Now Available on the iPad

Mobile devices and mobile connectivity are such hot topics right now, so it is natural that enabling learning on these devices is a big subject as well. As I started research on what it would take to bring e-learning to mobile devices 2 years ago, the predictions were staggering - even back then. In the short time span from that point until now, the numbers continue to grow rapidly upwards on the number of devices, users, and the amount of bandwidth consumed on mobile platforms. It was certainly evident then that we had to address this demand and deliver DigitalChalk on tablet devices.
As simple as that might sound on the surface, it took a lot of careful thought and planning because we did not want to offer our customers any less of an experience on their iPad or tablet than we did on their laptops. One of the strengths of DigitalChalk is our ability to track the student's activity to a very detailed level. To meet the strictest requirement in the continuing education space, we had to maintain the ability to do that tracking, as well as prevent the student from fast forwarding through the course if the instructor had configured the course in that manner. (Some accrediting bodies require students to meet or exceed a specific amount of time in a course.) Simply enabling an HTML5 based delivery of our video and audio lessons was simply not enough. We started over a year ago converting our encoding and streaming infrastructures and the content our customers were pushing into the system to facilitate this move. Terabytes of video and audio were reprocessed and packaged and hundreds of CPU hours were consumed in preparation for extending full functionality to iPads and tablets.
I am certainly interested in hearing ideas from our customers on what enhancements that would like to see in the future. We are working on a couple of things to be released very soon that I think you will all enjoy and were direct requests from some of our customers.
Monday, December 19, 2011
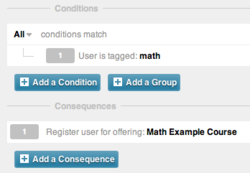
DigitalChalk Rolls Out Enterprise e-Learning and Discounts
Online training leader DigitalChalk introduces Enterprise features and shopping cart discount options in their latest release.
DigitalChalk was founded in 2005 and is headquartered in Asheville, NC. The SaaS training platform is available on a per-delivery fee basis for training professionals selling courses or a per-user basis for Business and Enterprise accounts. DigitalChalk is a full-service e-learning platform with course authoring, delivery and reporting included. DigitalChalk is the first and only online platform to provide HDLearn technology for video streaming capabilities that include tracking, progress control and reporting in a video lesson.
Friday, August 5, 2011
Asheville Cloud Computing Day
City announces speaker lineup for Asheville Cloud Computing Day 2011
ASHEVILLE - The City of Asheville's Information Technology Services Department is sponsoring "Asheville Cloud Computing Day 2011", a mini-conference scheduled for 9 to 11:30 a.m. Aug. 10 in the Municipal Building (100 Court Plaza, 4th floor).
The event seeks to share cutting-edge ideas about cloud computing, a technology that promises to improve city government, as well as other organizations that adopt it.
The agenda and speaker lineup will include:
- “Servers are Software: The Advantages of Cloud Architecture” - Joe Emison, VP, Research & Development, BuildFax.
- “How Citizens Can Use Open Data To Create New City Services” - Trevor Lohrbeer, CEO, Lab Escape.
- “Beyond the server: the rise of cloud-based desktops” - Steven J. Vaughan-Nichols, contributing editor, CBS News and ZDNet.
- “The Playground of Today’s Tech Innovators: How Cloud Computing Changes The Game” - Troy Tolle, CTO, Digital Chalk.
RSVPs from members of the community interested in attending the event are appreciated, but not necessary. RSVPs or questions about the event may be directed to @avlcio on Twitter, or jfeldman@ashevillenc.gov.
For information about Asheville's Information Technology Services program, visit http://ashevillenc.gov/its.
Sunday, February 20, 2011
Save Time with Custom Search in Chrome & Firefox
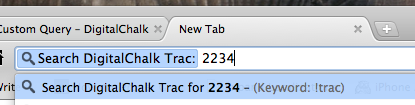
At DigitalChalk, we use Edgewall's Trac to for our development wiki and issue tracking system. Every single day, I will be talking with someone in sales, support, development or operations and will inevitably get asked to go and view a certain ticket by its ticket number. While it is simple to use the search field within Trac itself, it would be nice to just navigate straight to the ticket from the browser. This is where a custom search shined for me. You can take any known url and insert your search text right from the browser bar. I used this to setup a custom DigitalChalk Trac search that would take me straight to the ticket I was looking for saving me a click everytime.
Here is how you can set it up for yourself in Chrome:


Monday, January 3, 2011
DigitalChalk with HDLearn Technology

Friday, December 3, 2010
Alerts for EC2 through CloudWatch
Amazon has also enabled a new monitoring tab in the EC2 management console that will allow you to look at the graphs for these elements on each of your EC2 instances. The data only goes back to the 2nd of December since it was just released today, but this will be extremely useful for a quick read on how your instances are performing.

Amazon is certainly hitting things on my wishlist this year. Now if they would only enable CloudWatch and Alarms for metrics on SQS! Hopefully this is just around the corner. You can read more about the new features and the pricing of CloudWatch on EC2 here.
Wednesday, November 24, 2010
Downloading EXE files from S3

Friday, November 19, 2010
DigitalChalk is a Gazelle

I was interviewed by Mark Whitehouse about 2 weeks ago while I was walking down the street in San Francisco, a long ways from our headquarters in Asheville, North Carolina but right in the heart of tech startup country. He told me he was trying to do some research on why it was hard for startups right now to get adequate funding. I was excited to share with him about DigitalChalk and the success that we have been blessed with in some really hard economic times. Our growth this year has been better than it ever has and there is really no end in sight! As I described this to Mark, he told me over and over that we had all the markings of a great story as a Gazelle. I really like that analogy. Gazelles are extremely fast and nimble animals and if you had the opportunity to meet the team at DigitalChalk, I think it describes us completely. I get to work with some of the smartest people with the agility to change and go from 0 to 100 at anytime.
Reading through the article, and seeing some of the accomplishments in print in the Wall Street Journal is both exciting and humbling, but most of all, it makes me thankful for the passion and the dedication to all the people who make up the DigitalChalk team. This is something we can all look back on and be proud of.
Please check out the article: Shortage of Capital Costs Firm
Thursday, October 7, 2010
DigitalChalk takes SCORM to the Amazon Cloud
DigitalChalk, a learning management system serving the continuing education and professional training markets announces SCORM support on the Amazon Cloud.
Infinity Learning Solutions, the parent company of DigitalChalk announced today that they have successfully released the fall 2010 Aristotle 4 version with full SCORM 1.2 support. SCORM 1.2 compliant content is now available in all editions of DigitalChalk including Free, Pro, Business and School. DigitalChalk also added a checkpoint enhancement to the Chalkboard Editor, a browser based multimedia lesson studio that is included in DigitalChalk. The Checkpoint feature lets instructors insert interactive prompts and questions into a multimedia presentation through the browser.

"Hosting a SCORM compliant system in an advanced cloud computing platform such as Amazon Web Services (AWS) poses some unique challenges. SCORM uses communication specifications that were originally designed before the cloud was invented. We took a system with it’s own personality and wove the SCORM specification into it," said Troy Tolle, Chief Technology Officer of ILS. "The team accomplished the task in an innovative and highly scalable fashion. There was no impact to the thousands of organizations currently delivering courses on DigitalChalk today."
The SCORM specification was originally created by the US Department of Defense. Introducing SCORM into DigitalChalk helps address the growing demand from the US federal government for scalable software as a service (SaaS) learning management systems on the Apps.gov cloud infrastructure, which is modeled after the AWS system.
"Not only is DigitalChalk an industry leader in delivery of online training and continuing education, DigitalChalk is the first Learning Management System to build a SCORM compliant system in the cloud using Amazon Web Services that we are aware of," said Wes Hester, CEO of Foxhole Technologies, a VA based federal IT services company.
To learn more about DigitalChalk, visit www.DigitalChalk.com or call toll-free in the US at 877-321-2451. To learn more about Foxhole Technology and DigitalChalk in the Federal Market, please visit http://www.foxholetechnology.com/technology/cloud/digitalchalk.html. GSA Schedule 70: GS-35F-0569V
You can read more about the SCORM specification from Advanced Distributed Learning at www.adlnet.gov.
Monday, August 9, 2010
Creating a Maven Web Project in Eclipse
Let's assume a fresh install of Eclipse. I am using Eclipse 3.6 Helios for Java EE developers which you can download from eclipse.org. You will also need to download and extract Apache Tomcat 6. We will point to this Tomcat directory later when we go to test our project setup.
Our fresh install of Eclipse does not come with the necessary Maven plugins, so we will need to install them first. In Eclipse, navigate to your Help menu and select "Install New Software...".

In the top right hand corner, click on the "Add..." button and a dialog will appear that will allow you to add an new update site for the M2 Eclipse plugin. The Location is: http://m2eclipse.sonatype.org/sites/m2e . You can name the site anything that you like, but you will want it to reflect the name so that you will recognize it later if you come back to scan through your plugins. I have named mine M2Eclipse.

Clicking OK here will take you to a screen so that you can choose the pieces that you want to download. For this site, you only have one choice so it is easy. Check it and click finish and the plugin will start to install.

You will have to navigate and agree to the license. It will also ask you to restart eclipse after the install. You should go ahead and do this and return back to the "Install New Software..." screen after the restart. You will also need to install the M2 Eclipse Extras in the same way. The repository location for the extras is: http://m2eclipse.sonatype.org/sites/m2e-extras

This update site contains more than one item to install. You will not need to check the M2Eclipse Extensions Develop Support or the Project configurators for commonly used maven plugins. I do like to use Mylyn and the integration with CVS is nice to have, but they are not necessary. You can choose the ones that you feel you need for your development environment. The only one that you must pull down is the Maven Integration for WTP.

Clicking Finish here will take you through the license agreement again and then ask you to restart.
After restarting, let's continue by installing the Apache Tomcat runtime environment in Eclipse. Under Eclipse "Preferences..." navigate down to "Server > Runtime Environments". Click on "Add..." and select "Apache Tomcat v6.0" and click Next.

You will need to enter the Tomcat installation directory. This will be the directory where you extracted Tomcat. You can use "Browse..." to locate and populate that location.

We are now ready to create our Web project. Return to the Project Explorer in the Java EE perspective and choose File > New > Dynamic Web Project
Simply name your project and make sure that your Target runtime is set to Apache Tomcat 6.0 and your Dynamic web module version is 2.5

Click Next >
This screen will allow you to configure your folders for building the application. We are going to modify these folders to match the Maven hierarchy. This can be done later as well, but doing it now will avoid some copy and paste as well as some deleting cleanup. You will need to remove the "src" folder that is listed by default and add the following source folders:
- src/main/java
- src/main/resources
- src/test/java
- src/test/resources

Click Next >
We are also going to change the Web Module settings to match the Maven packaging. You will need to change the Content directory on this page from WebContent to "src/main/webapp".

Click Finish.
This completes the setup of the Dynamic Web Project. We now need to make it a Maven project as well. This can be done by right clicking on the project in the Project Explorer and choosing "Maven > Enable Dependency Management"

In this wizard, you will only need to change the Packaging to "war" instead of "jar". and click "Finish"

You should now see the POM editor in Eclipse. We need to add a compiler plugin for 1.6 that will help keep things building cleanly. Click on the Plugins tab at the bottom of the editor and then Click on "Add..." in the Plugins section at the top left. Search for the groupId of "org.apache.maven.plugins" and then choose the "maven-compiler-plugin" artifact from the list.

Click on OK and then navigate to the "pom.xml" tab in the editor. We need to add the configuration for 1.6 which we cannot do through the GUI. All that is needed is the configuration XML that is selected below.

Save and close the POM editor.
When that completes building, you may notice that the Java Runtime is giving you a warning in your "Markers" tab.

This can be remedied by changing your build path. You can right click on the project and select "Properties" and then change the build path JRE System Library to point to the 1.6 Execution Environment. If you do not have your Execution Environments set, you can simply click on the "Environments..." button on this dialog and point them to the JDK installation on your machine.


Clicking Finish here will rebuild the project and you should be error free in your Markers tab.
Now for some simple cleanup of your project. You can expand your project in the Project Explorer and navigate down to Web Resources > WEB-INF and delete the lib directory. We are going to let Maven and WTP work together to manage this.

You will also notice that you have a Classpath Dependency warning in your Markers tab. This is very important and will have to be addressed if you want your Maven managed dependencies to be available to your local test server.

Simply right click on the warning and choose the "Quick Fix" option.

Then you will be prompted with a popup explaining the suggested remedies to your problem. We need the classpath to be available to our server, so we need it to be added as a dependency. Choose that option and then click "Finish".

The setup is now complete. All that is left now is to test our new project and configuration. This is easily done by creating an index JSP in our webapp directory.


After saving the JSP, you can test your application by right clicking on the project and choosing "Run As > Run on Server"

Choose the Tomcat v6.0 Server and then click Finish. This will push your project to deploy on startup of that server and it will start the server.

When the startup is done, a browser window should appear in Eclipse with your index.jsp content displayed.

You are now off to the races on your new web project using Maven. All of the dependencies that you add to the pom file will be included in the classpath each time you start the server.
I hope that you found this useful. Let me know your experience.